Hello folks!
I would like to present my new blog series about penetration testing! This cybersecurity path is mostly about breaking into networks. I have to admit that my knowledge in this particular field isn't as much developed as I would like it to be. Therefore, I've decided to join the INE free course from the penetration testing category. I've already done some tasks earlier, but from now on each lab solved by myself will be presented on my blog. So without further ado, I present you Scanning and OS fingerprinting lab.
I'm using probably the most popular operating system for the penetration testing art - Kali Linux. This distro brings a lot of useful tools for making the whole process of breaking into networks easier. Penetration testing is based on the circle of actions that should be done if we want to be successful in attacking targets. Here's how it looks like:
In this lab, we are trying to accomplish the second stage of this "saint" circle -
Threat Modeling. Before going into the exploitation phase it's very important to
make the target space wider. Imagine throwing a dart into a shield. It would be a lot easier to hit the target if it will be wide enough, right? The same principle works when we do a penetration test. As attackers, we want to know as much as possible about the target. So to sum up - our goal in this lab is to
scan the entire network and
map running daemons to each host. After this action, we will know which host is the server, which is the router, and which is just a computer probably in some office. So now, let's get deep into the lab!
Our target is to map the enterprise network to which we are connected in.
To map the network we have to know what IP address belongs to this set of machines.
I'm connected to the network with the help of the VPN, so I have to look at the tap0 interface. Now it's clear that the IP address of the attacked network is 10.142.111.0 with the 24-bit netmask. Apart from the main challenge we have some goals to accomplish. Here they are:
In the real-world penetration test, I would probably not use the fping tool because it doesn't give any useful information besides that the scanned host is alive or not. But I'm still learning and that's why I'm going to run a ping scan. Maybe this practical example will be necessary someday?
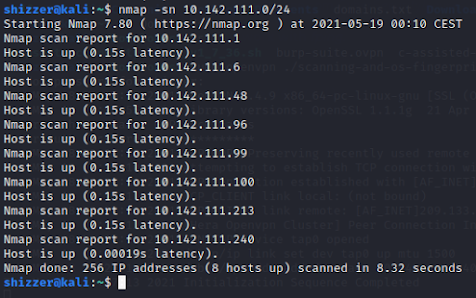
The above IP addresses belong to hosts that responded after the ICMP packet was sent. So these hosts are alive and we can talk to them. Nmap is a great tool for mapping networks. This is the time to use it against our target. The first thing that we have to do is to run a ping scan again but with the help of nmap, not fping.
There is a difference between the result of these two programs. Nmap has given us information that the host with an IP 10.142.111.213 is up but the fping didn't state that. The fping is a primitive program compared to nmap since it sends ICMP echo requests and nothing more. Nmap sends ICMP echo requests too but also a TCP SYN packet to each host on port 80. Probably some networking service is running on the newly detected host and nmap noticed it in a smart way. We can also be pretty sure that the 10.142.111.213 host blocks ICMP packets or the firewall does it for it.
The network is still a mystery. We have to identify clients and servers to perform a successful attack. But apart from that, we should be quiet. For this kind of task, SYN port scan is a great solution. It doesn't connect to the scanned host, because each time the three-way handshake is not completed.
I've scanned only live hosts since as you might remember nmap sends SYN packets while doing ping scanning. It appears that the 10.142.111.100 is a client because it doesn't listen on any port for connections. The rest of the machines are servers.
It appears that we can throw the client host out from our interesting field. To make the network more "visible" for us let's identify the versions of daemons listening on the network. It can be very helpful in the next stage of the penetration testing process. (vulnerability assessment) Obviously, we will use nmap to do the right job.
We've received plenty of information. But I think the most interesting and important to remember is that the host with the IP 10.142.111.213 runs an HTTP server at the non-default port 81. This host didn't respond to the ICMP packet sent via fping. Nmap has given us information about OS'es that are probably running on the hosts. For example, the old Windows XP controls the 10.142.111.48 server. This makes the server vulnerable and it can be potentially our specific target while breaking into the network. The last goal in this lab is to identify the operating system running on each host. (if possible) So let's do it with -O nmap option.
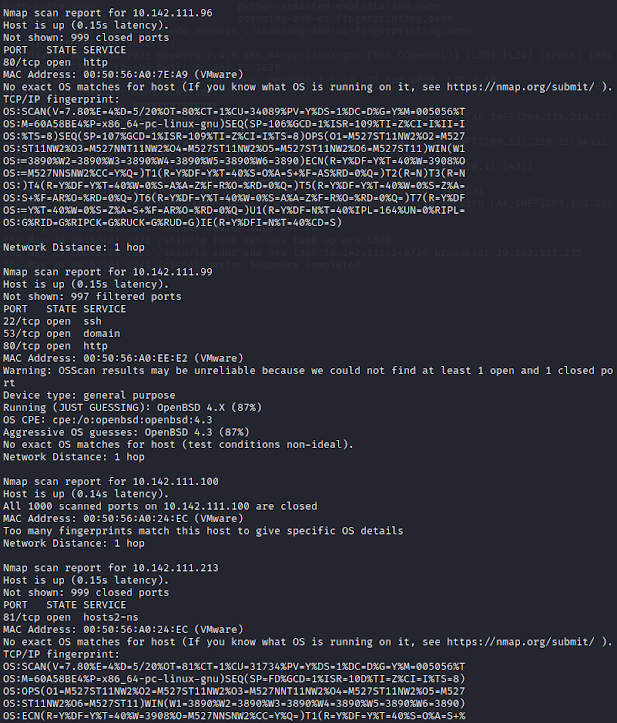
This time nmap didn't tell us much. It means that the tool didn't know how to match TCP/IP stack implementation of each host to the data that resides in the database. But we can still deduce some useful information about OS'es running on the clients and servers from the services banners. For now, let's write what nmap guessed about some machines since this is all we can do with the result of the OS mapping option in this case.
10.142.111.1 -> OpenBSD 4.X|3.X|5.X (92%), FreeBSD 9.X (86%)
10.142.111.6 -> Unknown OS
10.142.111.48 -> Unknown OS
10.142.111.96 -> Unknown OS
10.142.111.99 -> OpenBSD 4.3 (87%)
10.142.111.100 -> Unknown OS
10.142.111.213 -> Unknown OS
When the OS mapping option of nmap fails we should check once again at the detected services. They have very interesting banners that we can exploit to gather information about OS running on the specific machine. So you can look above in this article and read the result of mapping after using
-sV option. Now we can tell more about operating systems used across the network.
10.142.111.1 -> This server is running FreeBSD according to the SSH service banner
10.142.111.6 -> The OS running on this server is some sort of Debian distribution that's what we can deduce from the SSH service banner
10.142.111.48 -> The OS, in this case, is Windows XP. It's pretty clear because of the microsoft-ds service version named Microsoft Windows XP microsoft-ds.
10.142.111.96 -> The Apache HTTP server on this server tells us that it has some Debian distro on board.
10.142.111.99 -> Again the SSH service banner comes to our aid. The running OS here is FreeBSD.
10.142.111.100 -> Unknown OS because all ports are closed and there is no way to talk with this host.
10.142.111.213 -> We have another Apache HTTP server on port 81 and a third Debian incarnation in the squad.
That was the last goal on our list. Thanks for reading and I hope to see you soon!
Peace.


Comments
Post a Comment